SharePoint
has become a platform for secure collaboration in many organizations all around
the globe, especially after the introduction of SharePoint Online. SharePoint
can handle tremendous data sizes, that is not the problem. The problem occurs
when you need to migrate SharePoint.
To
solve this issue Microsoft has released SharePoint Migration Tool. The
application is designed to migrate content from SharePoint Server 2013 or
on-premises file shares easily to either SharePoint or OneDrive in Office 365.
The problem here is that the tool focuses on
content migration, and that is very limited. To answer this, Microsoft released
another component called “SharePoint Migration Assessment Tool” or SMAT for
short. The tool is a simple command line executable that scans the contents of
a SharePoint farm to help identify the impact of migration.
The
“SharePoint Migration Assessment Tool" tool is available in two modes:
·
Assessment and Identity Mapping. The assessment mode
runs scans against the SharePoint farm and associated content looking for
issues that have been known to cause problems for customers migrating into
SharePoint Online.
·
The Identity Mapping mode allows you to generate a
report of all the user and group identities that have access to your SharePoint
environment and attempts to map those identities to Azure AD user and group
identities.
There
is no user interface for this tool, and it is run completely using command line
syntax. The application utilizes two configuration files:
·
“SkipSitesList.csv”
which allows the application to skip sites, excluding them from the report.
·
“ScanDef.json”
is also available in the same directory, allowing you to disable or enable
individual scans within the assessment tool.
SMAT.exe
is used at the command prompt. Navigate into the extracted application
directory and type: SMAT.exe
The
current engine will launch the scanning tool, and the engine starts a separate
window listing the items found within the current site.
After
the application completes scanning, base report details are available within
the “Log” directory. This directory contains a log of the following:
·
Actions
·
Errors
·
Summary
report
·
Site assessment report
·
and all the “CSV” files now populated with data from
the SharePoint farm.
The
“CSV‘ files such as “CustomizedPages-detail.csv” are available to be opened and
viewed. These files contain the raw data entries retrieved through the scanning
process.
After
completing a scan, the report is generated displaying information about
potential issues that need remediation before migrating to SharePoint Online.
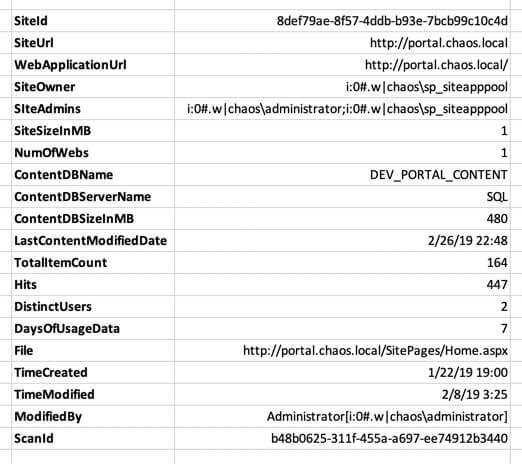
For example, my scan revealed two customized pages, and the report simply
rendered the following values and link:
Clicking
the link takes you to the documentation for that specific item within the SMAT
section of “docs.microsoft.com.” The information provided only offers a view of
the data but not of the customization found.
Though
this is useful information for identifying locations of customizations or other
assets and features that need checking, it is just information of where items
exist and no deep inspection of what has changed.
The
SMAT tool works perfectly, at least to give you a log of potential issues that
need addressing, for an organization looking to migrate to SharePoint Online or
OneDrive for Business. However, it does
not give you a more in-depth inspection into code items; list where web parts;
scripts or even other components are within the site. It is assumed that when
using the SMAT tool that other processes
are in place to manage those elements.


Comments
Post a Comment